Showing posts with label Distress Oxides. Show all posts

Tuesday, August 28, 2018

House Mouse Tails Entwined Card with Charm


Today I want to show you my card using the Stampendous Tails Entwined stamp. Isn't it just so sweet and romantic!

Here are the tools I used:
Stampendous Tails Entwined Stamp
Memento Tuxedo Black ink
Stamp Shammy to clean ink off
MISTI stamp positioning tool
Fiskars Razor Edge Easy Action Scissors
Masking paper
Tombow Liquid and dry adhesive
Ranger Distress Oxide Blueprint
Ranger Distress Oxide Lemonade
Ranger Blending tool and sponges
Spellbinders Platinum 6 machine
Paper Piazzaz Light Blue Suede paper
American Crafts Gold Glitter Cardstock
Heart charm from my stash and thread
Spellbinders Chantilly Lace Annabelle's Trousseau frame die
Copic Sketch Markers: E15, E18, E21, E33, YR24, E37, YG93, YG95, YG97, B95, B97, B99.
Petaloo Bonanica Velvet Hydrangea
Ribbon from Ribbon Resource
Instructions: Using my MISTI tool, which really helps keep the alignment perfect, I positioned the stamp in one corner centered with an A4 piece of Neenah Bright White cardstock and stamp with the Memento Black ink. This ink is used when you are coloring with Copic markers as not to contaminate the markers. After I removed the Neenah cardstock, I then replaced it with an A4 sized piece of masking paper and stamped the image again . By keeping the image you have the alignment for a final stamping if the image gets smudged while using the distress oxides to add the black lines back. By the way, you can also use copy paper with re-positional glue, if you don't have any masking paper. Next, I fussy cut out the little mice and all the details, even the space between their bodies I also left the "sky" above the mice's heads where the moon is, and so that I could go back and replace it and leave the "hole" where the moon is and cover the space around it.
 I like using my Fiskars Razor edge easy action scissors to cut next to fine lines. I cut everything out, including the moon, and positioned them in the right places on the Neenah Cardstock.
Now, I began blending with the Distress oxide in Blueprint, covering the "moon". When that was finished, I put the "sky" above the heads and uncovered the "moon" and used Distress Oxide in Lemonade. Removing the masking paper, I continued to blend out LIGHTLY around it into the blue "sky" so that it appears to have a halo affect.
Coloring the images using Copic markers is so relaxing and I chose the deep dark blues. Later I matched that blue with "felt/suede" paper I had from years ago.
Next, I die cut the A4 colored piece with the Chantilly lace frame, centering it as I saw fit. I die cut another glitter "gold" piece of cardstock with the same die and layered them together using the liquid adhesive.
Glued all the layers together onto an A4 premade card.
Added the blossoms with Tombow dry adhesive.
Challenges I am entering this in are:
Word Art Wednesday Challenge #348-349
HMFMC #273 Anything Goes-option "Add A Charm"
Simon Says Monday Challenge: Fall/Autumn for the Harvest Moon
CARDZ TV Anything Goes Challenge #61
Stamplorations Summer theme & Sketch Challenge
Frilly and Funkie: Back to Nature

Thursday, June 14, 2018

Aall & Create Feather Card 2

Had to use that Aall & Create Stamp set #11 one more time for the #thedailymarker30day coloring challenge for Day 13. And then I turned it into a little notebook using the Webster's Pages polka dot personal notebook after splashing some Gansai yellow gold onto the violet colors. The background was done with blending the Ranger Ink Distress Oxides in Blueprint and Lemonade until I liked the shading. Super black ink was achieved with Tsukinedo Memento Tuxedo Black ink, of course since I used my Copics in BV00, BV02, BV04. Distress Micro Glaze was added to ensure no damage to the piece because it will be in use and may get wet. I then spread a splatter of ZIG Kuretake Gansai Tambi Starry Colors in yellow gold ink over the top to add shine.The outside die cut was Reverse Confetti's Lacey Scallop Frame Die with a deep color that matched the Blueprint ink. My Platinum 6 was used so as to make it slightly smaller in width to fit the front nicely.
  After gluing all the layers onto the notebook, I decided to add some soft black seam binding adding Gansai gold since it was still on my desk.  Hope you enjoy my inspiration today!

Challenges I am entering:
#thedailymarker30day Coloring Challenge
Simon Monday Challenge: Simon Says Anything But a Card
#neverstopcrafting

Sunday, June 10, 2018

Aall and Create #11 Card

#thedailymarker30day @kathyrac hosting this is so fun and I am loving discovering great images like this one by Aall and Create called #11. Designed by Fiona Paltridge. (the image is no longer available at Simon Says Stamp but others are here.) I used my Copic Sketch markers: B0000, B11, B23, R20, R24, R29 after stamping with Memento Tuxedo black ink on my Misti. I blended with Ranger Mermaid Lagoon, and Squeezed Lemonade Distress Oxides on the background. After making it into a card with yellow Bazzill cardstock, I then added Tonic Nuvo Crystal drops in Red Berry, and Ebony Black, even added it to the image like the heart and some of the stripes. I wanted it to add some dimension and interest. This is so fun to color!!!
Challenges:
Simon Says Monday Challenge: All things Bright and Beautiful
Word Art Wednesday #338-339


Wednesday, June 6, 2018

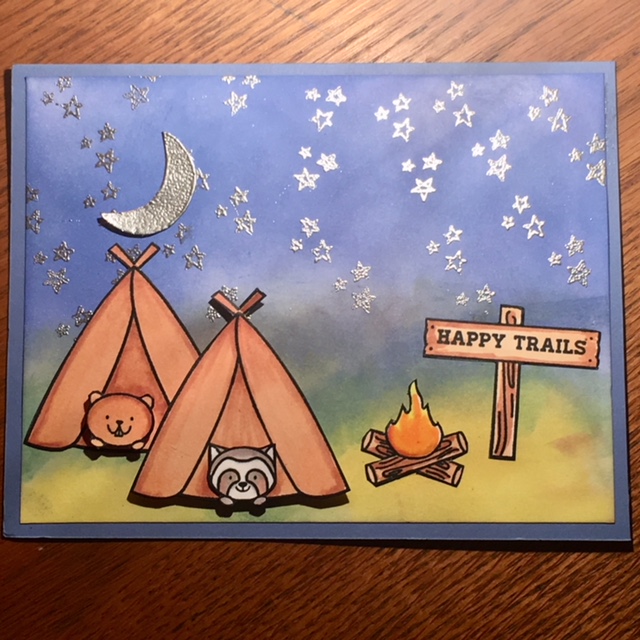
Pretty Pink Posh Camp Friends Card


I used Pretty Pink Posh Camping Friends stamp set to make this adorable card for #thedailymarker30day For this card, I started with stamping all the images with my Misti and Memento Tuxedo Black ink. I colored all of them with Copic Sketch Markers: YR04, YR06, E21, E33, W1, W3. After fussy cutting all the images out, I went around all the edges with a Copic 100 black pen so as no white paper edge showed. The background panel was made by blending with Ranger Distress Oxides for the with Blueprint, Squeezed Lemonade, Evergreen Bough, and Aged Mahogany. I arranged all the images and glued them down with Tombow MONO liquid adhesive and used foam tabs to make some of them look 3D. Next, I stamped a pattern of 2 different sets of the stars over the background panel with VersaMark ink and then added Hero Arts Silver embossing powder and used my heat gun. I fussy cut the moon and adhered it to a scrap piece of paper and using the same process again, I embossed it with the silver powder. It really looks stunning in real life.
Challenges:
Simon Says Monday Challenge: All things bright and beautiful for the starry night
Simon says Wednesday Challenge Anything Goes
Challenge Weeks #338-#339 - Anything Goes