
I pulled out one of my newest Stampendous House Mouse stamp called, Wreath Rolling stamp (HMP52) from House Mouse Designs. The little mouse just screamed to play so I thought I would put him onto an action card.


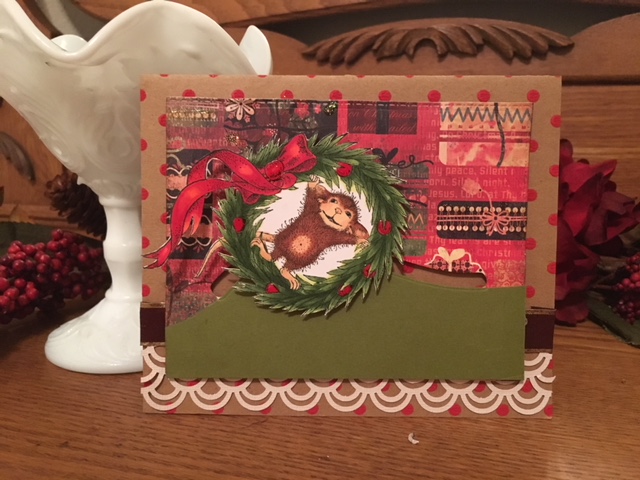


Stamp the Wreath Rolling stamp onto Neenah Bright White cardstock with Memento Tuxedo Black ink. Using my Copic markers, I began coloring it, and then fussy cut the whole wreath out. Die cut a rectangle piece of holiday patterned paper. Choose a matching cardstock and cut it the same width by 2 inches. Align the two pieces at the bottom and adhere it in the lower corners. Using washi tape, tape the Creek Creations slide die downso as to keep it in place and so that the die will be cutting through the holiday patterned paper and the small cardstock piece. I personally don't like the rectangle shape so I clipped it so that it looked like a small hill. Before going any further, adhere the two pieces permanently. Take the Creek Bank Creations "slide guides" which are the pieces that allow the image to "roll over the hill" There are two pieces for each guide, a male and female. Place small glue Dodz on the back on 2 males, and 2 female pieces. Adhere each male piece to a 1 inch punched circles. Place ONE of the female guides with the Glue Dot onto the image and then "pop" it into the coordinating Male guide. I chose to snap the left ones together first. Now figure out where the second and final guide would look the best, and snap it into place adhering the last guide into place on the image. Once everything is "clicked" into place you will have the card front all finished. Now, place foam squares around the edges as well as directly in the center of the card front while leaving space for the guides to slide by.
I made a fancy border die cut out of white cardstock, and added ribbon with a touch of gold to a cardstock card base. I centered the card front to the card base and slide the cute House Mouse along to "loosen" it up the first time. And that is how it is done!
Other details: added brown ink to the edges of the pattern paper and then yellow stickles to the details as well.
Supplies:
Neenah Bright White Cardstock
Memento Tuxedo Black ink
Wreath Rolling stamp (HMP52) from House Mouse Designs
Copic Markers: R20, R22, R24, R27, R29, E00, E21, E33, E37, E50, YG21, YG63, YG67.
Creek Bank Creations Slide Die with 2 CBC slide guides as well.
Spellbinders Platinum 6 Die cutting machine
Jillian Vance pierced Rectangle die
Basic Grey Jovial Nipping pattern paper
Bazzill Green cardstock
Core'dinations kraft with red embossed dots cardstock for the cardbase
Fiskars Razor edge easy action scissors
Fiskars Trimmer
Bone folder
EK Success 1 inch circle punch
Martha Stewart Border punch-decorative
3-D Foam Mounting Squares by Scrapbook Adhesives
Dodz Scrapbook Adhesive by 3L
Double sided adhesive for the ribbon by Scrapbook adhesive by 3L
Ranger Yellow Stickles
Ranger Distress Ink in Walnut for the edges of the pattern paper
Red and gold ribbon
Challenges I am entering it in:
Simon Says Stamp Monday Challenge Christmas in July-I'm #78
Simon Says Stamp Wednesday Challenge: Anything Goes-I'm #56
House Mouse & Friends Monday challenge #271
Word Art Wednesday: Challenge #344-345


