Monday, September 17, 2018

Cosmo Cricket Western Layout


Well, as you can see I have had some fun in catching up with my old photos, and finally getting them scrapbooked!!! This was a night we went to the Silver Spurs Rodeo in St. Cloud, Florida. The most fun was meeting all of the Cowgirl pageant winners from all the different places!! And they rode in the Rodeo too!! Talented, and beautiful!!! Tons of fun and spent it with my daughter who is pictured on the right page with the other beauties! Somehow my husband and other friends never made it into my pics so weren't in the layouts. Shucks!
Supplies:
Cosmo Cricket Wanted collection in 12x12.
Cricut Explore machine
Cricut Country Life cartridge-made the cowgirl with the guitar and the girl on the horse.
Cricut Old West cartridge for YeeHaw and the hat
Different shades of Cardstock mostly Bazill Basics
Distress inks for shading with blending tool
Fiskars 12 inch trimmer
Copic Sketch marker: E00, E21

Challenges:
Challenges on Scrapbook.com: Won on Cricut cuts
Biten by the Bug 2: Anything goes with Cricut cut

Wednesday, September 12, 2018

House Mouse Birthday Chick

This is my newest Stampendous House Mouse Stamp and it was so perfect to play along with their challenge using the new Creek Bank Creations Outline Letters and Numbers Dies which is used with their CBC Super Tacky Tape. Here is a picture of the way I die cut it using my Platinum 6 in two glitter sheet colors and then swapped the colors from each to have a two tone affect!!! Super easy and fast to do.
Next, I stamped the adorable stamp using my MISTI tool without the inner foam pad since the stamp has its own padding. Used Memento Ink to stamp the image due to my coloring with Copic Sketch Markers. The Markers I used were: Y06,Y08,Y15(chick), BG10,BG11,BG13(it's hat),E00,E21,E23,E33,E53,R20(mouse), R24,R27,R29(it's hat), C1,C3(cupcake icing and shadows), YR15,YR16(cupcake wrapper). Used various colors for the rainbow of sprinkles. 
I used the Echo Park Party Time 6x6 papers. I wanted the number to stand out so a had to pop it up on a rosette made from orange paper kind of matching the cupcake wrapper. Added some pretty white and effervescent sequins to finish it off. All the glitter sheets were from Joann Fabrics cardstocks. Hope you will enjoy the cute image as much as I have!! Super adorable House Mouse and little chickie, and perfect for any celebration!!

Challenges:
House Mouse HMFMC #274 Anything Goes/Add a Number
Simon Says Stamp Wednesday Challenge: Pop it up

Monday, September 10, 2018

Basic Grey Sweet Threads Layout


Using Basic Grey Sweet Threads kit from Pictures in Time made by Janet Wells, I turned the idea into my own layout with 2, 5x7 photos and 2, 4x6 photos.  I loved how the papers really brought out the vividness of the pictures. This photos were done as the girls were testing how they could take shots with one of their new iPhone 7's and that meant doing multiple ones and testing the filters, etc.  I just loved these shots and wanted to showcase them in an album for my daughter of these fun times. Yes, that is Harry Potter world at Universal Studios and that's Butter Beer that they are drinking, hence, by sticker that says, "Buttercup" as a joke!!
How to make the layout: All the sheets of paper and embellishments are from the Sweet Thread collection by Basic Grey but you can use what ever papers you choose if you like my sketch of what I've done. Using the 2 sheets of Sweet Threads Pink side of Retro Clutch as the background, begin to lay out the photos as they are centered at the center seam of the double layout. I used washi tape to hold down the two so as to make sure that they are perfectly aligned. Next, Cut two pieces of Ruffled Mini, for the "bookends of the line of photos. The I matched them with the bold green from Mix and Match for the small rectangles above the smaller 4x6 photos on either side. Corner round and add brown ink to the edges as seen. Added some strips of paper from the cut off waste paper that tells the name and had the UPC on it to the bottom of the right side, 5x7 photo. I made sure to keep them not uniform as to add interest. Adding the stickers and gem stones were all apart of the kit's layout such as the "Happy" and the pin wheels but I changed not using all the other things and doing different and making it my own. Love kits for having so many adorable and matching products all together to create whatever you desire. Highly recommend it!
Challenges I am entering:


Tuesday, August 28, 2018

House Mouse Tails Entwined Card with Charm


Today I want to show you my card using the Stampendous Tails Entwined stamp. Isn't it just so sweet and romantic!

Here are the tools I used:
Stampendous Tails Entwined Stamp
Memento Tuxedo Black ink
Stamp Shammy to clean ink off
MISTI stamp positioning tool
Fiskars Razor Edge Easy Action Scissors
Masking paper
Tombow Liquid and dry adhesive
Ranger Distress Oxide Blueprint
Ranger Distress Oxide Lemonade
Ranger Blending tool and sponges
Spellbinders Platinum 6 machine
Paper Piazzaz Light Blue Suede paper
American Crafts Gold Glitter Cardstock
Heart charm from my stash and thread
Spellbinders Chantilly Lace Annabelle's Trousseau frame die
Copic Sketch Markers: E15, E18, E21, E33, YR24, E37, YG93, YG95, YG97, B95, B97, B99.
Petaloo Bonanica Velvet Hydrangea
Ribbon from Ribbon Resource
Instructions: Using my MISTI tool, which really helps keep the alignment perfect, I positioned the stamp in one corner centered with an A4 piece of Neenah Bright White cardstock and stamp with the Memento Black ink. This ink is used when you are coloring with Copic markers as not to contaminate the markers. After I removed the Neenah cardstock, I then replaced it with an A4 sized piece of masking paper and stamped the image again . By keeping the image you have the alignment for a final stamping if the image gets smudged while using the distress oxides to add the black lines back. By the way, you can also use copy paper with re-positional glue, if you don't have any masking paper. Next, I fussy cut out the little mice and all the details, even the space between their bodies I also left the "sky" above the mice's heads where the moon is, and so that I could go back and replace it and leave the "hole" where the moon is and cover the space around it.
 I like using my Fiskars Razor edge easy action scissors to cut next to fine lines. I cut everything out, including the moon, and positioned them in the right places on the Neenah Cardstock.
Now, I began blending with the Distress oxide in Blueprint, covering the "moon". When that was finished, I put the "sky" above the heads and uncovered the "moon" and used Distress Oxide in Lemonade. Removing the masking paper, I continued to blend out LIGHTLY around it into the blue "sky" so that it appears to have a halo affect.
Coloring the images using Copic markers is so relaxing and I chose the deep dark blues. Later I matched that blue with "felt/suede" paper I had from years ago.
Next, I die cut the A4 colored piece with the Chantilly lace frame, centering it as I saw fit. I die cut another glitter "gold" piece of cardstock with the same die and layered them together using the liquid adhesive.
Glued all the layers together onto an A4 premade card.
Added the blossoms with Tombow dry adhesive.
Challenges I am entering this in are:
Word Art Wednesday Challenge #348-349
HMFMC #273 Anything Goes-option "Add A Charm"
Simon Says Monday Challenge: Fall/Autumn for the Harvest Moon
CARDZ TV Anything Goes Challenge #61
Stamplorations Summer theme & Sketch Challenge
Frilly and Funkie: Back to Nature

Tuesday, August 21, 2018

Pinkfresh A Day in the City Card


This is #JenniferMcGuireinspired for sure! After watching her video, I made this exactly the same way!! Love this stamp set.... together or separately!
To Make this card:
Using Pinkfresh A Day in the City I die cut it first then used the Geo Leaf Background die to leave it with pattern. I then added the separated images that were stamped and colored using my MISTI and Copic Sketch markers. The colors were Y11, Y19, YG06, R20,R22, for the houses, and then more YG06 with YG11 and YG13 for the trees. Same yellows for the sun and then made lines to fill in the "rays". Fussy cut them all out, and glued down with my Scotch fine line glue dispenser. I made it exactly like hers and it was really harder than I thought it would take. Now I have several cut out and in process to make a whole stack. I want these for the ones that have just left for college and those setting out on a new life.
I finally adhered it to a blue cardstock A2 card base. The next ones are different colors but the same really. Bolder colors!! Enjoy!
Challenges
Simon Says Stamp Monday Challenge: Back to School#11
Simon Says Stamp Wednesday Challenge: Back to School#89
WordArtWednesday Challenge Anything Goes #348-349#101
Cardz TV Challenge #61 Anything Goes#27

Friday, August 10, 2018

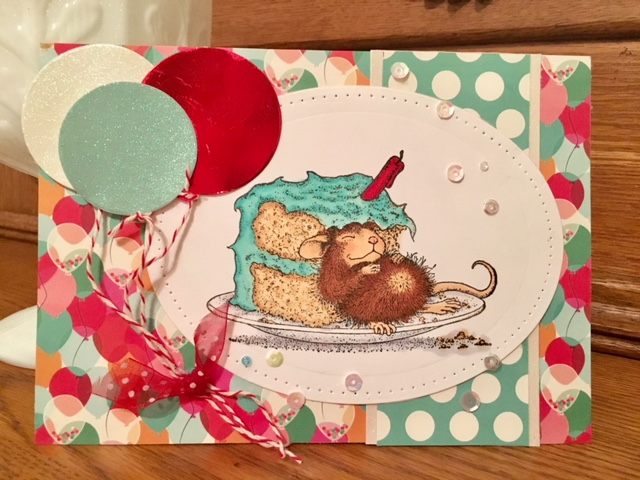
House Mouse Birthday Card

Coloring these little House Mouse images makes me so happy!! They seem to have a great life, don't they?
For this image called Eat Cake and Nap too: E00. E21, E33. E37, E50. E53, BG10,BG11, BG13. R24,R27,R29. I stamped the image with Memento Tuxedo Black with my MISTI. I matched these colors with the Echo Park Party Time 6x6 papers. This is a more masculine and colorful card than my frilly ones. I used my Spellbinders Pierced ovals die as well as the Celebration set that had the balloon dies with my Platinum 6 die cutting machine.  The pierced oval represents the stitching I was to do for the House Mouse challenge. And the balloon twine is to represent the threads. Twine by Divine Twine. Sequins to show the frivolity of the celebration were from Kennedy Grace Creation called Chantilly.
Challenges I am entering:
House Mouse HMFMC #272 Anything Goes/Option Stitching (Real or Faux)
Word Art Wednesday #346-347
Cardz TV Anything Goes Challenge #60


Thursday, August 9, 2018

Pretty Pink Posh Holiday Pals Card

Using the Pretty Pink Posh Holiday Pals stamp set, I stamped two trees and two critters onto Neenah Bright White cardstock and colored them with my Copic Sketch markers. I then took regular thin copy paper and cut a template for the clouds and the humps for the hills. Using the Ranger Distress Oxides in Mermaid Lagoon, and Evergreen Bough for the sky and grass, respectively. Blending the colors onto another piece of folded Neenah White Cardstock was so easy and quick. I just played till I liked the result.  If you notice, I made the hill have a shadow by darkening it on the one edge. I fussy cut out the critters and placed them as seen. Using the Pretty Pink Posh Hummingbird Thanks sentiment and my MISTI, I stamped right onto the card itself.
Challenges I am entering it in:
Simon Says Stamp Wednesday Distress It
Word Art Wednesday: #346-347
Three Amigos Blog Challenge Time Warp: Jan 2018 Anything Goes


2 Crafty Critter Crazies