Showing posts with label Basic Grey. Show all posts

Monday, September 27, 2021

Rochelle Spears September Sketch Layout


Using Rochelle Spears sketch challenge I put this layout together. I had matched up some old Basic Grey papers including Stella Ruby Ladies Book Club (stripe), Pyrus Pear Pie (small circles) and other papers in my stash to throw off the neon pink of the t-shirt that he was wearing. Really wanted to tone it down. Embellishments: Chipboard pieces from Prima Marketing; Metal Bible:

I used Sequins/Gems(3 stars and one black gem in the hole of the 2004 piece), Ephemera(Jillibean Soup word pieces and blank journal squares), Chipboard (the 2004, clock and hour glass). And metal and word strips added as well, for good measure!


Other Challenges I am entering:


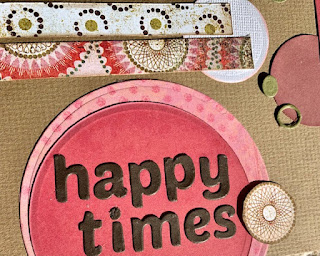
Basic Grey Infuse Happy Times Layout


Loved using more of my old Basic Grey papers: Stella Ruby (strip), Infuse collection for the other 4 papers. I inked the edges with Distress ink and oxide in Walnut Stain and Aged Mahogany. 

I used this sketch from Sketches In Thyme #486-Week 4

Other challenges I'm entering:


Lasting Memories Challenge-#567 Use 5 different pattern papers-4 different Basic Grey papers plus the dotted swiss pattern paper


Lasting Memories Challenge #563-Polka Dots-the circle under the title.


Monday, September 10, 2018

Basic Grey Sweet Threads Layout


Using Basic Grey Sweet Threads kit from Pictures in Time made by Janet Wells, I turned the idea into my own layout with 2, 5x7 photos and 2, 4x6 photos.  I loved how the papers really brought out the vividness of the pictures. This photos were done as the girls were testing how they could take shots with one of their new iPhone 7's and that meant doing multiple ones and testing the filters, etc.  I just loved these shots and wanted to showcase them in an album for my daughter of these fun times. Yes, that is Harry Potter world at Universal Studios and that's Butter Beer that they are drinking, hence, by sticker that says, "Buttercup" as a joke!!
How to make the layout: All the sheets of paper and embellishments are from the Sweet Thread collection by Basic Grey but you can use what ever papers you choose if you like my sketch of what I've done. Using the 2 sheets of Sweet Threads Pink side of Retro Clutch as the background, begin to lay out the photos as they are centered at the center seam of the double layout. I used washi tape to hold down the two so as to make sure that they are perfectly aligned. Next, Cut two pieces of Ruffled Mini, for the "bookends of the line of photos. The I matched them with the bold green from Mix and Match for the small rectangles above the smaller 4x6 photos on either side. Corner round and add brown ink to the edges as seen. Added some strips of paper from the cut off waste paper that tells the name and had the UPC on it to the bottom of the right side, 5x7 photo. I made sure to keep them not uniform as to add interest. Adding the stickers and gem stones were all apart of the kit's layout such as the "Happy" and the pin wheels but I changed not using all the other things and doing different and making it my own. Love kits for having so many adorable and matching products all together to create whatever you desire. Highly recommend it!
Challenges I am entering:


Friday, May 25, 2018

Coffee Lover's Bloghop


To start off with my first for this Spring + Summer Coffee Lover's Bloghop, I chose Newton's Cuppa Cactus which I stamped with Memento Tuxedo black using my MISTI tool. I used Strathmore plain cardstock ATC paper. I then colored using my Copic Markers: YG63, YG67, YG21, RV29, RV14, RV13, E50, E53, W1, W3 which all matched the Basic Grey pattern papers I had chosen. This collection is called South Pacific and the flower paper is Tahiti. Then Nuvo Crystal Drops in black were added to have a finished look.
The front panel was then glued down using the BG papers onto a folded 4.5" x 5.25" card made of a bright green cardstock.
I fussy cut the flower and leaf and added them under my ATC piece for some interest.

                  Don't forget that today the Spring + Summer Coffee Lover's Bloghop starts! My card is #86 if you are looking for it!
Also, entering this in 


Tuesday, March 20, 2018

Charleston Road Trip Basic Grey layout


 I really enjoyed our road trip to Charleston, SC July 2017!! Getting all my pictures scrapbooked was impossible so I combined all the pictures on one double page layout. I love it with I get inspired from someone's page kit and then turn it into my version of their sketch!! This is old Basic Grey Curio kit from 2010, I found in my stash which I matched up with Prima Marketing flowers, and Say it with Crystals black bling in swirls and lines. These photos are some of the streets through the old town of Charleston which we totally enjoyed seeing!!
Here are two other pictures I posted on Instagram of the fun things we found in that great old city!!
Cotton Wreath Picture
Ribs at Swig N Swine BBQ

The photo of the two of us, was taken against a brick wall after I realized I had not taken any of our trip together, just before leaving!! My daughter was there earlier and she had already left so none of her as well!! Well, maybe next time!

The directions: I chose two basic background papers so as to add to the old vintage street photos, and cut them down as to have a 5x7 matted photo and city name below.
Before I start any page, I work out the layout the way I think it will go, and loosely base all my cuts on that idea. I use Pinterest, Sketches, and ideas to inspire them as I did this one. I will give you measurements of how I did mine but feel free to change anything!

The pink background papers were cut to be 9"x 11 1/2". I inked these with Distress Ink in Walnut brown before gluing them on the papers.  I placed each pink sheet 1 1/2" from the top and bottom with sides of each abutting each other respectfully as seen in first picture above. I inked all the following papers with the same ink before placing them on the layout.
I then added a border at the top and bottom from fussy cutting 3 lace borders from one of the sheets of paper. I matched the two at the top and abuted them to the top of the pink background paper as seen. For the lower lace border I shifted it to the left side and then glued it down and cut through the part that connected the two 12x12 sheets for my double layout.
Next came the arrangement of photos. I chose to make our selfie 5x7, and the others wallet size, and 3.5x5". I matted each with papers from the collection with a 1/4" border, inked and glued in place. Using the Basic Grey Curio "Take Note" package of transparencies I chose the two I used and glued them in place. Using the Alpha Sticker sheet, I chose Happy Times, and added the letters to the center of the top left page. Using a ruler, I lined up the black bling on either side of that title. I then added 3 brads in maroon to the bottom right on the transparency. I used a hole punch since I had difficulty pushing them through. For the second page I chose the black swirl bling, and placed it down being careful to leave room for the 3 flowers I had chosen that matched the photos and layout colors. I had already matted all photos and left room just for this space for the bling and flowers. That makes it so much easier. After everything was glued downed, I tried to write my notes but the pen I had at the crop, started to smear so I stopped. I'll do it later!!

Supplies: Basic Grey Curio: 2 sheets of Cotton, Rose Water, Gonach, Linen, Cabriole pattern papers. Curio Alpha Sticker Sheet; Curio Take Notes Transparency kit; Indian Summer brads. Scotch Tape Runner. Glue Dots for flowers. Prima Marketing flowers from my stash. Prima Marketing Say it with crystals in black, and lines; Ranger Ink Distressing Ink in Walnut with blending tool; Ruler; Hole punch and  Scissors.Walgreen photo developing of wallet size photos by doing them in Collage setting of 4x6 to make them the perfect size I needed.
Challenges:
Simon Says Stamp Monday Challenge: Road Trip

Sunday, December 3, 2017

Merry Christmas


I am thrilled to have a challenge with Marker Pop to help me get some more Christmas cards done! Hoping to keep up with their challenges as much as I can and here is mine for day 3.
Supplies:
Spellbinders Mystical Frames die cut from Ruby Slipper Bazzill smooth cardstock. The Merry Christmas sentiment is from Waffle Flower die cut from smooth off white from my stash.  Basic Grey Christmas papers to add color and a May Arts bow ribbon where I cut just one off to use for the front. I love that I can mail this without extra postage too!!
Merry Christmas,
Beverly
Challenges
Simon Says Stamp Christmas Card

Friday, November 24, 2017

Baby's 1st Christmas using Kennedy Grace Creations


Hello, it's Beverly here today!! I know you all may be out shopping this being Black Friday but with Christmas around the corner, I am hustling to get holiday greeting cards out for all my favorite people in the world! One of those is my girlfriend who just had her baby girl, and I have delighted in "playing helper" to her and her family.  Such a pleasure to have a newborn baby in your arms, isn't it!! Well I felt I really wanted to make her an extra special card using Kennedy Grace Creations Baby Be Mine Stamps set paired with Sweet Baby Mine Sequins to make this delightful shaker for Baby's 1st Christmas.
First I started with a trial run of coloring this cute giraffe in pink. It just didn't make me happy. I tried again and made her yellow with pink dots, and that seemed to be a more natural look, so I went with that one. The original mock up was not as bright, so I tried more intense colors. Also, I had this fabulous paper pack from Basic Grey that had vibrant pinkish reds and I felt it carried the colors so much better than stark reds or vibrant solids.

I hope it inspires you to make all your Holiday cards early, as it takes me quite a long time for special treats to my dear friends!! But I love every minute of it!!
Here are some close ups:


Such a delightful mix of pastels in the Sweet Baby Mine Sequins including little seed beads:

Supplies also included: Copics: BG53, BG11, BG10, YG13, E000, E21, E11, Y15, Y13, RV21, RV13, R22, R00, R20, C1, C3 and blender solution; Neenah Bright White 110#; Memento Tuxedo Black ink pad; MISTI, Basic Grey Christmas Evergreen 6x6 pad, Spellbinders Platinum Die cutting machine; Prickley Pear D043 Flourished Oval Nesting Die; Hammermill Transparency; Scotch foam mounting tape.
You find my post on the Kennedy Grace Creations blog as well.

Challenges:
Simon Says Stamp Wednesday Food and/or drink-Baby Bottle on mine
Word Art Wednesday #310-311
Marker Pop #132

Friday, October 27, 2017

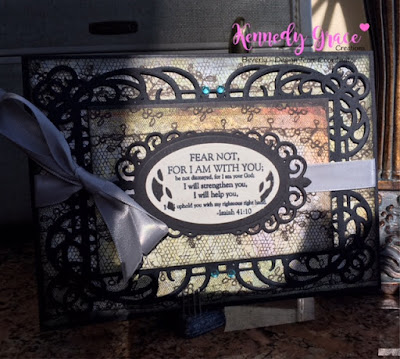
Spellbinders Mystical Scripture Card


In light of this time of year, I wanted to do something inspiring a sense of mystery and fascination as well addressing how I fear the future in today's times. Here is what I came up with.
Using my Spellbinders Mystical die set which is so beautiful alone, I matched it with old Basic Grey Curio prints and the new stamp set from Kennedy Grace Creations Inspirational Verses. I really loved the verse, "Fear Not".  Such an important part of having faith that God is in control despite what evil men are doing.  I hope it gives you comfort as it did me.
You can view more of the Kennedy Grace Creations inspiration on their blog where you can see this post, HERE.
Entered in the following:
Simon Says Stamp Monday Challenge: Monochrome
Simon Says stamp: Wednesday Challenge Anything Goes
Word Art Wednesday #306-307 Anything Goes

Thursday, September 21, 2017

2017 Fall Coffee Lovers Card


Using my new Paper Smooches stamp and die, I made this card from fall papers in my stash. Hope you enjoy it!
Challenges:
2017 Fall Coffee Lovers Blog Hop-#fallclh