Tuesday, August 28, 2018

House Mouse Tails Entwined Card with Charm


Today I want to show you my card using the Stampendous Tails Entwined stamp. Isn't it just so sweet and romantic!

Here are the tools I used:
Stampendous Tails Entwined Stamp
Memento Tuxedo Black ink
Stamp Shammy to clean ink off
MISTI stamp positioning tool
Fiskars Razor Edge Easy Action Scissors
Masking paper
Tombow Liquid and dry adhesive
Ranger Distress Oxide Blueprint
Ranger Distress Oxide Lemonade
Ranger Blending tool and sponges
Spellbinders Platinum 6 machine
Paper Piazzaz Light Blue Suede paper
American Crafts Gold Glitter Cardstock
Heart charm from my stash and thread
Spellbinders Chantilly Lace Annabelle's Trousseau frame die
Copic Sketch Markers: E15, E18, E21, E33, YR24, E37, YG93, YG95, YG97, B95, B97, B99.
Petaloo Bonanica Velvet Hydrangea
Ribbon from Ribbon Resource
Instructions: Using my MISTI tool, which really helps keep the alignment perfect, I positioned the stamp in one corner centered with an A4 piece of Neenah Bright White cardstock and stamp with the Memento Black ink. This ink is used when you are coloring with Copic markers as not to contaminate the markers. After I removed the Neenah cardstock, I then replaced it with an A4 sized piece of masking paper and stamped the image again . By keeping the image you have the alignment for a final stamping if the image gets smudged while using the distress oxides to add the black lines back. By the way, you can also use copy paper with re-positional glue, if you don't have any masking paper. Next, I fussy cut out the little mice and all the details, even the space between their bodies I also left the "sky" above the mice's heads where the moon is, and so that I could go back and replace it and leave the "hole" where the moon is and cover the space around it.
 I like using my Fiskars Razor edge easy action scissors to cut next to fine lines. I cut everything out, including the moon, and positioned them in the right places on the Neenah Cardstock.
Now, I began blending with the Distress oxide in Blueprint, covering the "moon". When that was finished, I put the "sky" above the heads and uncovered the "moon" and used Distress Oxide in Lemonade. Removing the masking paper, I continued to blend out LIGHTLY around it into the blue "sky" so that it appears to have a halo affect.
Coloring the images using Copic markers is so relaxing and I chose the deep dark blues. Later I matched that blue with "felt/suede" paper I had from years ago.
Next, I die cut the A4 colored piece with the Chantilly lace frame, centering it as I saw fit. I die cut another glitter "gold" piece of cardstock with the same die and layered them together using the liquid adhesive.
Glued all the layers together onto an A4 premade card.
Added the blossoms with Tombow dry adhesive.
Challenges I am entering this in are:
Word Art Wednesday Challenge #348-349
HMFMC #273 Anything Goes-option "Add A Charm"
Simon Says Monday Challenge: Fall/Autumn for the Harvest Moon
CARDZ TV Anything Goes Challenge #61
Stamplorations Summer theme & Sketch Challenge
Frilly and Funkie: Back to Nature

Tuesday, August 21, 2018

Pinkfresh A Day in the City Card


This is #JenniferMcGuireinspired for sure! After watching her video, I made this exactly the same way!! Love this stamp set.... together or separately!
To Make this card:
Using Pinkfresh A Day in the City I die cut it first then used the Geo Leaf Background die to leave it with pattern. I then added the separated images that were stamped and colored using my MISTI and Copic Sketch markers. The colors were Y11, Y19, YG06, R20,R22, for the houses, and then more YG06 with YG11 and YG13 for the trees. Same yellows for the sun and then made lines to fill in the "rays". Fussy cut them all out, and glued down with my Scotch fine line glue dispenser. I made it exactly like hers and it was really harder than I thought it would take. Now I have several cut out and in process to make a whole stack. I want these for the ones that have just left for college and those setting out on a new life.
I finally adhered it to a blue cardstock A2 card base. The next ones are different colors but the same really. Bolder colors!! Enjoy!
Challenges
Simon Says Stamp Monday Challenge: Back to School#11
Simon Says Stamp Wednesday Challenge: Back to School#89
WordArtWednesday Challenge Anything Goes #348-349#101
Cardz TV Challenge #61 Anything Goes#27

Friday, August 10, 2018

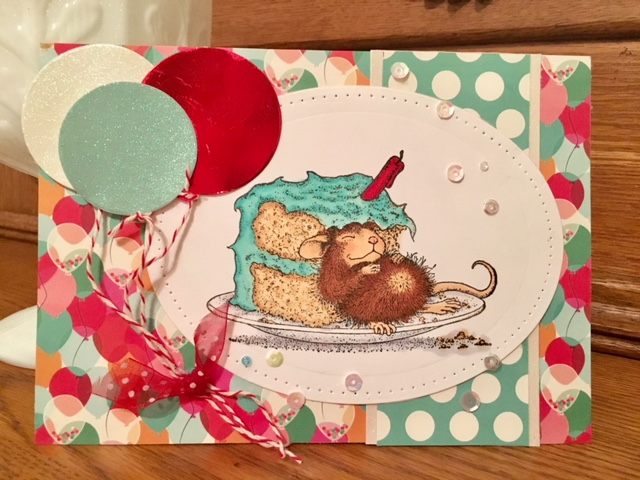
House Mouse Birthday Card

Coloring these little House Mouse images makes me so happy!! They seem to have a great life, don't they?
For this image called Eat Cake and Nap too: E00. E21, E33. E37, E50. E53, BG10,BG11, BG13. R24,R27,R29. I stamped the image with Memento Tuxedo Black with my MISTI. I matched these colors with the Echo Park Party Time 6x6 papers. This is a more masculine and colorful card than my frilly ones. I used my Spellbinders Pierced ovals die as well as the Celebration set that had the balloon dies with my Platinum 6 die cutting machine.  The pierced oval represents the stitching I was to do for the House Mouse challenge. And the balloon twine is to represent the threads. Twine by Divine Twine. Sequins to show the frivolity of the celebration were from Kennedy Grace Creation called Chantilly.
Challenges I am entering:
House Mouse HMFMC #272 Anything Goes/Option Stitching (Real or Faux)
Word Art Wednesday #346-347
Cardz TV Anything Goes Challenge #60


Thursday, August 9, 2018

Pretty Pink Posh Holiday Pals Card

Using the Pretty Pink Posh Holiday Pals stamp set, I stamped two trees and two critters onto Neenah Bright White cardstock and colored them with my Copic Sketch markers. I then took regular thin copy paper and cut a template for the clouds and the humps for the hills. Using the Ranger Distress Oxides in Mermaid Lagoon, and Evergreen Bough for the sky and grass, respectively. Blending the colors onto another piece of folded Neenah White Cardstock was so easy and quick. I just played till I liked the result.  If you notice, I made the hill have a shadow by darkening it on the one edge. I fussy cut out the critters and placed them as seen. Using the Pretty Pink Posh Hummingbird Thanks sentiment and my MISTI, I stamped right onto the card itself.
Challenges I am entering it in:
Simon Says Stamp Wednesday Distress It
Word Art Wednesday: #346-347
Three Amigos Blog Challenge Time Warp: Jan 2018 Anything Goes


2 Crafty Critter Crazies

Wednesday, July 25, 2018

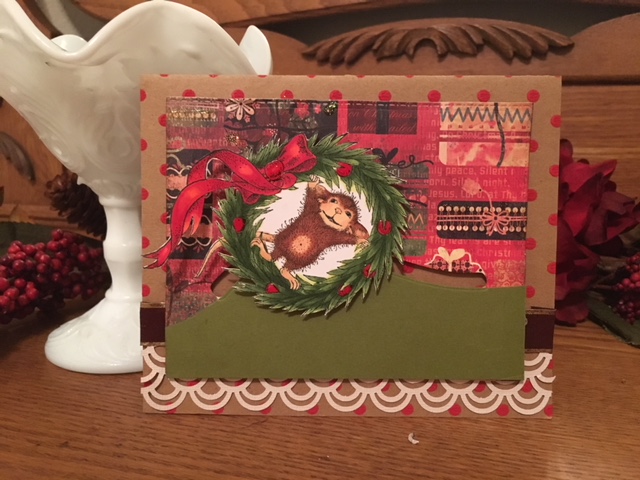
Christmas House Mouse card


I pulled out one of my newest Stampendous House Mouse stamp called, Wreath Rolling stamp (HMP52) from House Mouse Designs.  The little mouse just screamed to play so I thought I would put him onto an action card.


To recreate this card:
Stamp the Wreath Rolling stamp onto Neenah Bright White cardstock with Memento Tuxedo Black ink.   Using my Copic markers, I began coloring it, and then fussy cut the whole wreath out. Die cut a rectangle piece of holiday patterned paper. Choose a matching cardstock and cut it the same width by 2 inches. Align the two pieces  at the bottom and adhere it in the lower corners. Using washi tape, tape the Creek Creations slide die downso as to keep it in place and so that the die will be cutting through the holiday patterned paper and the small cardstock piece. I personally don't like the rectangle shape so I clipped it so that it looked like a small hill. Before going any further, adhere the two pieces permanently. Take the Creek Bank Creations "slide guides" which are the pieces that allow the image to "roll over the hill" There are two pieces for each guide, a male and female. Place small glue Dodz on the back on 2 males, and 2 female pieces. Adhere each male piece to a 1 inch punched circles. Place ONE of the female guides with the Glue Dot onto the image and then "pop" it into the coordinating Male guide. I chose to snap the left ones together first. Now figure out where the second and final guide would look the best, and snap it into place adhering the last guide into place on the image. Once everything is "clicked" into place you will have the card front all finished. Now, place foam squares around the edges as well as directly in the center of the card front while leaving space for the guides to slide by.
    I made a fancy border die cut out of white cardstock, and added ribbon with a touch of gold to a cardstock card base. I centered the card front to the card base and slide the cute House Mouse along to "loosen" it up the first time. And that is how it is done!
Other details: added brown ink to the edges of the pattern paper and then yellow stickles to the details as well.
Supplies:
Neenah Bright White Cardstock
Memento Tuxedo Black ink
Wreath Rolling stamp (HMP52) from House Mouse Designs
Copic Markers: R20, R22, R24, R27, R29, E00, E21, E33, E37, E50, YG21, YG63, YG67.
Creek Bank Creations Slide Die with 2 CBC slide guides as well.
Spellbinders Platinum 6 Die cutting machine
Jillian Vance pierced Rectangle die
Basic Grey Jovial Nipping pattern paper
Bazzill Green cardstock
Core'dinations kraft with red embossed dots cardstock for the cardbase
Fiskars Razor edge easy action scissors
Fiskars Trimmer
Bone folder
EK Success 1 inch circle punch
Martha Stewart Border punch-decorative
3-D Foam Mounting Squares by Scrapbook Adhesives
Dodz Scrapbook Adhesive by 3L 
Double sided adhesive for the ribbon by Scrapbook adhesive by 3L
Ranger Yellow Stickles
Ranger Distress Ink in Walnut for the edges of the pattern paper
Red and gold ribbon
Challenges I am entering it in:
Simon Says Stamp Monday Challenge Christmas in July-I'm #78
Simon Says Stamp Wednesday Challenge: Anything Goes-I'm #56
House Mouse & Friends Monday challenge #271
Word Art Wednesday: Challenge #344-345

Saturday, July 21, 2018

Stampendous Flossing is a Must! Card


I am in love with this sweet image that someone in the past has given me. I don't have the stamp but could use my Copic Sketch markers with the image due to the heavy cardstock it was stamped on. Here's what I used to make the card:
Stampendous Flossy Easter image
Cardstock by Bazill Basics Paper
My Minds Eye 6x6 papers
Spellbinders Platinum 6 die cut machine
Spellbinders Tallulah die
Spellbinders Tool 'n One
Jillian Vance Pierced Rectangles
Copic Sketch Markers: Y11, Y13, Y15, B0000, B000, B02, YG11, YG13, R00 R20, RV21, E18, E21, E33, E37, E53, YR24.
3-D Foam Mounting Squares by Scrapbook Adhesives
Tombow Mono Liquid Glue
Darice Rhinestones on the frame


To recreate this card:
Stamp the image onto a #110 lb piece of Neenah Bright White cardstock
Use Memento Tuxedo Black ink
Misti stamping tool makes it easier to get a crisp image
Begin to color the image using the Copic markers.
Die cut the image with the Pierced Rectangles
Die cut a fancy frame like this Spellbinders Tallulah die, and use the Spellbinders Tool 'n One to get all the dots out.
Choose a matching cardstock for the card base, frame and then patterned paper to coordinate with the color combo.
Add to the card as seen using adhesives to glue down and pop up respectively.
Add a seam binding bow, tied with triple loops.
Challenges I am joining:
House Mouse & Friends Anything Goes/Summer-I couldn't find my summer stamp so used this one
Simon Says Stamp Monday Challenge: Add a little sparkle- Added Rhinestones on the die cut corners#206
Simon Says Stamp Wednesday Challenge-Use a die cut-my Spellbinders die#275
Word Art Wednesday Challenge Anything Goes #344-345
Love to Scrap Challenge #111 Blog-Anything Goes
Cardz TV Anything Goes Challenge #56


Thursday, July 12, 2018

Crate Paper Anniversary Album


Using the fabulous Crate Paper Confetti collection by Maggie Holmes (@MaggieHDesign), I put together a gift album for my husband to celebrate our anniversary. He loves my albums to be in his office and look at our life blessed by God! It has been 38 loving years with this wonderful man!!! Crazy, fun and a wonderful ride! I even put our pic of us on a ride at Disney just because I thought it was symbolic of what life brings you! Truly a blessing to ride this life as I know it with him by my side! Thank you Jesus!
Album details: Confetti Collection by Crate Paper chipboard stickers, all double sided papers, American Craft Celebrate Phrases Thickers, and more stickers. A loved how they all looked with the Prima Marketing album designed by Donna Downey. I received these older items from someone else and was grateful to have, since it matched the theme of what I was needing. Hope you enjoy the pages I have included. There is more but I thought this was photo heavy as it was!!! Enjoy!
Challenges:
Frilly and Funkie Be Happy-Birds inside pages and a very happy album!