Tuesday, January 24, 2017

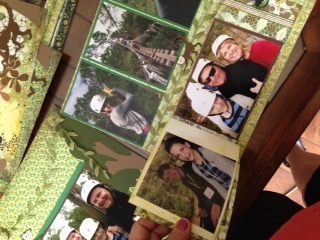
Basic Grey Origins Double Layout-Ziplining in Central Florida


This was a wonderful double layout I made of pictures from years ago. We spent our Christmas money from a family member to go on this expedition of ziplining in the Central Florida Area. I highly recommend this family fun! We swung through the pine forest outside all the Disney and tourist area. Pretty weather during the Florida Christmas holidays! Hope you enjoy the pictures! Also, I had so many pics that I made a mini album that attaches to the second page. By the way, I made 6 layouts total!! I wanted to put these in my daughter's and son's albums and have one for myself.
Here are list of some of the supplies: May Arts Vine ribbon and 1/8'" green. Basic Grey Origin papers and various other Basic Grey papers and cardstocks are from Bazzill to match. over 20 sheets of BG and cardstocks were used! I really raided my stash for sure!
The Cricut cuts were done on my Cricut Explore or my friends when we were crafting together. I used the following cartridges: Monkeys: Noah's ABC animals; Trees: My Community
Place:

Forever Florida Ziplines & Adventures in the Wild - St. Cloud, FL 


Also, here are challenges I am linking with for my layout: 
Scrapbook.com Cricut Challenge Cut three monkeys and one tree
Simon Says Stamp Anything but a card-layout
Simon Says Stamp Spread Your Wings-Ziplining is like flying!
Word Art Wednesday-Anything goes-"I lift up mine eyes-My help comes from the Lord!" Loved that we were doing something that really was scary and I trusted my Lord with my life!! LOL!!


Saturday, January 14, 2017

Graphic 45 Time to Flourish Card


Using Graphic 45 gorgeous papers from Time to Flourish, I made a handfull of cards for thank you's, and birthdays.  So many people I am owing cards!!! Love my new die from Paper Smooches Happy Birthday, and cut it using red cardstocks to match the card. Also, the red edge is from the Strathmore premade cards I love to bring out those gorgeous colors from the pretty cardinal.
To "pop" the accents, I used my favorite adhesive Scrapbook Adhesive 3D Squares. Love using these all the time. Good to mail too. Also added sequins in red and gold.
Here's the Challenges I am adding this to:
Simon Says Stamp Wednesday Challenge: Winter Birthday#74
Dar2VArtzy Blog-Something New-#10
Word Art Wednesday: Anything Goes Weeks #264-265-#281

D.L.Art-January Challenge#111


Friday, January 13, 2017

Graphic 45 Time to Flourish Cards

Using Graphic 45 Time to Flourish January papers I made a bunch of cards! What fun that was to use every piece of it and come out with 7 great cards. Not all are pictured here.


Used Paper Smooches new dies: Heartfelt thanks, and Love & Cherish. Just got them for Christmas!! Brand new, and loving them!

Thursday, January 12, 2017

Spellbinders Sympathy Card

For this square card, I started with a Doodlebug Design Square Cards and then used matching pattern papers to make this Sympathy card. The Spellbinders Gold Label 4 die for the center, and the Stampin Up Sympathy stamp set, as well.
It saddens me to write that one of my husband's friend has died in the prime of his life, at age 51. I sent this to his beloved wife and 4 children under the age of 16. So sad but really what saddens me is that a card really isn't enough to convey our deep regret. There is a fund of course but you know what I mean in that, I wish there was more. Praying for their strength and faith.
Challenges:
Simon Says stamp Monday-Be Square #88

Sunday, January 8, 2017

Julie Nutting Doll Card

 This is one of the many February Birthday cards I need to send so am starting to make them now! Using the Audrey doll, I paper pieced her and placed her on Graphic 45's Time to Flourish February papers. Set a box to the side and used Kennedy Grace Tea Cup which I love! Colored with Copic Markers: YG67, YG07, R39, R20, E19, Y21, and E53. Fussy cutting everything! Used a Strathmore premade card with the red frayed edge. Her hat is another piece of the Graphic 45 but the back side. I thought it matched up well with this week's Paper Crafter's Corner Challenge #167
Here:
Side note: I have been off working and not making much so broke open my new Audrey doll, and started with my never used Time to Flourish as well! What fun I am having now. More to post later!
Other challenges:
Simon Says Stamp Monday: Start Afresh-using something not openned!! #315
Simon Says Stamp Wednesday: Something new #349
Crafty Hazelnut's Pattern Paper Challenge january 2017 #124
DL.ART JANUARY-Anything goes #72
Coffee Loving Cardmakers CASEing -Terri Burson's with the coffee cup in a square and using pattern paper.
Dare2BArtzy Blog January-Something New

Sunday, December 25, 2016

Strawberry Torte with Blueberries

Merry Christmas and here's my Strawberry Torte recipe for all of us that love "sweets" and it's one that actually is diet and fat free! Hope you enjoy it as much as my family does! And this is what we have for "Happy Birthday Jesus" for Christmas! Yum!

Strawberry Blueberry torte or trifle


Angel food cake (I make mine from Betty Crocker mix)
 (You won't be using all of the cake!!!  Cut or pull apart into 1" cubes.)
Filling:
1 can Eagle Brand FAT FREE condensed milk
water
1 Box of Jello Sugar Free White Chocolate Instant Pudding mix
1 can of Reddi Whip Can of whip cream (preferred over Cool Whip but it's personal taste)
1 1/2 Quarts Strawberries cut with an egg slicer
1 pint Blueberries
Tools: Hand mixer and large mixing bowl2 cup measuring cup and large scraper; Large trifle bowl as seen in picture. 


Bake the Angel Food cake according to directions on the box.  Cake needs to cool down before assembling. 
While it cooks, start the pudding. 
Get a 2 cup measuring cup.  Put 1/4 cup water in the bottom, and then pour Eagle Brand Fat Free condensed milk in. Scrape all of it you can out of the can. Stir to mix the water with the condensed milk before continuing to fill the cup up to the 2 cup point with a bit more water, mixing it again before adding.  Pour into a large mixing bowl. Add the pudding mix and using hand mixer, mix on low for 2 minutes. Clean mixer blades into pudding so that you get as much as possible off. Spray 2 cups or more of the Reddi Whip whip cream into pudding and "fold" into the pudding.  This means gently with a large scraper "folding" it over itself several times until it is mixed. Try NOT to stir it.  Refrigerate until cake is cooled and ready to assemble the torte.
Assembling:
Layering:  1" portions of Angel Food cake on bottom. There are two layers, and you decide how much you want to use so put 1.5 to 2 inches of the cake. Next, the majority of the blueberries, holding back some for the top, as seen in the picture.  Top with HALF of  pudding mixture, spreading it gently over lower level.
 Now for the second layer of cake cubes, but this time use a layer of strawberries.  Spread remaining half of pudding mix on top of that.  Arrange the pretty top with strawberries fanning out from the middle with blueberries as the center.  The Torte or Trifle should be refrigerated until ready to eat.  Good luck keeping the family away from it before your guests get to enjoy it. Once you taste it you will see why I say that.
 Oh, and by the way, it's DIET!!! Low on calories and fat and full of good things from the berries. Unfortunately, it does have High Fructose Corn Syrup in the Eagle Brand, and Bad sweetner in the pudding mix. But those are miner since it saves you tons in calories and fat.  

Saturday, December 17, 2016

Pretty Pink Posh Feminie Tag

On Essentials by Ellen they are hosting 12 Tag of Christmas with a Feminine Twist 2016 Challenge.  I have been inspired by a few of them and am posting my tag to play along.

 I was inspired by Carissa Wiley's pretty tag using Pretty Pink Posh's stamps with the glitter edge to the snow slopes. I moved my 2 trees to different spots, and used the adorable bunny instead of the snowman. I also used glitter instead of foil. Since I didn't have a stitiched tag die, I used the Storybook die to kind of match all the stitch lines. Carissa used so many shimmery elements so I used: Glitter ribbon, shimmery word paper brought out the pinks in the scene better that brown wood colors so I chose that instead, too. Sequins for shimmer and shine. Also, white edges on the trees instead of the foil for snow.  
Pretty Pink Posh products: Storybook 5 dies; Holiday Pals stamp set. Also, WPlus9 Holiday Apertures die set for outside stitich lines.
Copic Markers: YG 06, YG 67, B10, C3, RV02, RV04, Momento ink Tuxedo Black, MISTI, Uniball Impact White pen, Radiant Neon Ink Pad, elctric pink, Big Joy stamp, Creative Expressions Cosmic Shimmer Glitter in Iced Snow, May Arts Silver glitter ribbon, Kennedy Grace Sequins Moonbeams, Pink Cardstock and twine, DCWV Glitter cardstock and Reminese Christmas Carols pattern paper which is shimmery.  I used the pink cardstock and made the earmuffs pink as well to show the feminine twist. Shimmer papers in soft colors as well. Hope you enjoy it!
Challenges I am entering it in:

12 Tag of Christmas with a Feminine Twist 2016 Challenge